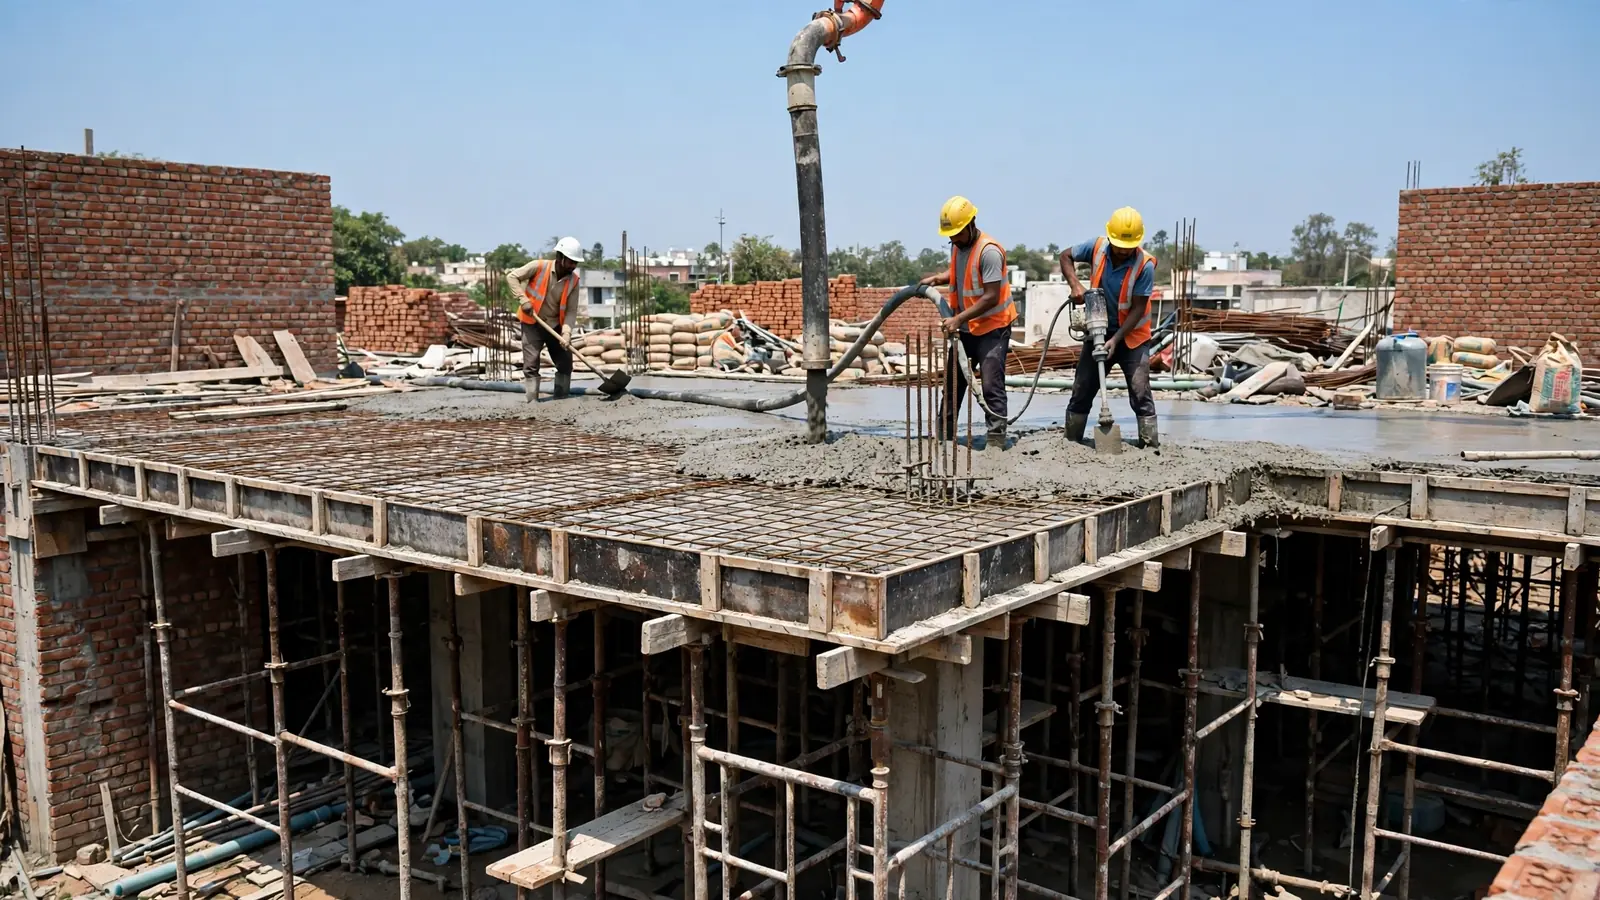
The slab is the one part of your house you cannot redo without demolishing it. A wall can be rebuilt and a floor re-laid, but a badly cast slab stays with the house for life.
Slab day is also the most expensive single day of a residential build: several truckloads of concrete, a full gang, and a day of shuttering, steel, and supervision that cannot be paused. The checks below take about an hour the evening before and a few minutes at each stage. They are the difference between a slab that reaches its design strength and one that only looks like it.
1. Why slab day decides the next fifty years
A slab carries everything above it: the next floor, the walls, the people, the furniture, the water tank, the roof. Most slab failures show up months later: a damp patch on the ceiling, a hairline crack that widens every summer, a floor that feels springy underfoot. The causes are almost always the same short list: shuttering that moved under the load, steel that sat too low, concrete that arrived too wet or was vibrated badly, and curing that stopped after two days because the gang moved to the next job. Every one of those is visible before the pour, or preventable during it, if someone is watching. A homeowner with this checklist and the approved drawing can catch most problems by asking the right questions at the right hour. The drawing is the authority; this checklist verifies the ground matches it.
2. Before casting: the shuttering checklist
Shuttering is the temporary mould the slab is cast in: it must hold tonnes of wet concrete without bending, leaking, or shifting. Check it the evening before casting, while there is still time to fix it.
Line and level. Check shuttering levels with a water tube level or a dumpy level, not by eye: a slab 10 mm low at one corner holds water on the roof for years.
Props on a firm base. Every prop must stand plumb on a sole plate on firm ground or the slab below, never on loose soil or bricks, braced sideways. A prop that sinks 5 mm under load drops the slab with it.
Tight joints, clean and oiled. Run a hand along the joints: gaps leak cement paste, leaving honeycombing, where stone shows through. The surface should be clean and lightly oiled. Too much oil is as bad as none: it stains the concrete and stops plaster bonding later.
Openings, sleeves, and conduits. Box out every opening for stairs, ducts, and shafts before casting, and fix electrical conduits and plumbing sleeves in place now: chasing them into a cured slab means cutting concrete and steel.
Material and labour on site. Confirm the concrete order, truck count, pour sequence, two needle vibrators, trowels, screed boards, curing material, and enough labour for the full pour without a break. Cast continuously; running out halfway leaves a cold joint, where fresh concrete meets concrete that has already started to set.
3. Reinforcement: the steel you will never see again
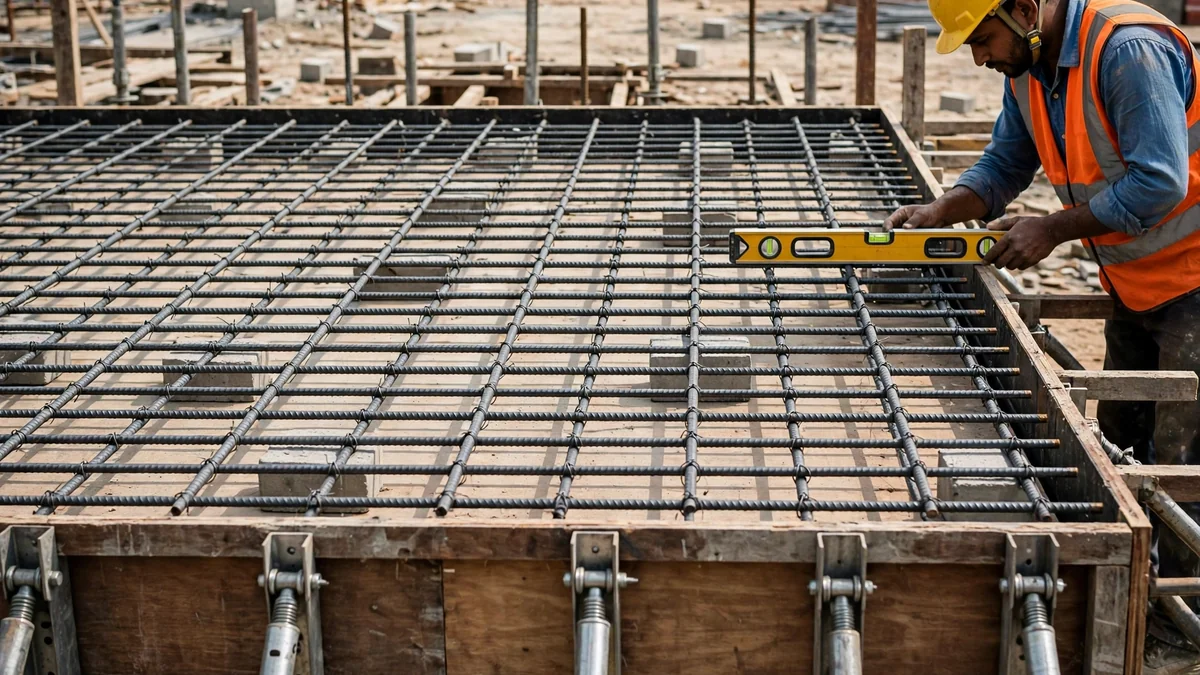
Once concrete covers the steel, nobody can check it without breaking the slab open, so compare it with the approved drawing before the first truck arrives.
Bar size and spacing. Check the diameter and spacing of main and distribution bars against the drawing. A 10 mm bar where the drawing says 12 mm is a weaker slab. Spacing, centre to centre, should be even across the slab.
Cover blocks. Cover is the concrete thickness between steel and surface; it protects the steel from rust. For a slab in mild exposure, IS 456 Table 16 specifies a nominal cover of 20 mm. Cover blocks hold the steel off the shuttering; check they sit at regular intervals, roughly one per square metre, with no steel resting on the shuttering. Bars touching the formwork rust within a few years, expand, and crack the ceiling below.
Laps and chairs. Where bars are joined, lap length must follow the drawing, usually a multiple of the bar diameter, and laps should be staggered. In a two-way slab the top steel must sit on chairs at the right height. If the steel bounces underfoot, the chairs are too few or too weak, and the top steel will end up at the bottom of the slab, where it does almost no work. Check beam steel too: stirrups at drawing spacing, tighter near supports, column starters in position and tied.
4. The concrete itself: slump, cubes, and the water trap
Ready-mix or site-mixed, the checks are the same: the grade on the drawing, workable enough to place, and proof of what went into it.
Slump test, every truck. The slump test measures workability: fill a cone, lift it, measure the slump. Run it at the point of placement for every truck, or at least the first, then at regular intervals. The acceptable slump comes from the mix design; 75 to 125 mm is commonly quoted for pumpable slab concrete, but the mix design is the authority. Keep every delivery ticket: grade, cement, water-cement ratio, admixtures, departure time. Concrete in the truck beyond about 90 minutes from batching starts to set and should not be placed.
Never add water on site. This is the single most common slab mistake in India: a stiff load arrives, someone adds a hose of water so it pours easily, and the water-cement ratio rises. Extra water makes concrete weaker, more porous, and likelier to crack. If a load is too stiff, reject it or send it back. A plasticiser dosed as per the mix design is the correct fix, not water.
Cube tests, sampled properly. Cubes prove the concrete's strength. One sample is three 150 mm cubes, all tested at 28 days; a 7-day result comes from a separate sample, not a second cube from the same set. IS 456 Clause 15.2 sets the minimum: one sample per 1–5 m³, two for 6–15, three for 16–30, four for 31–50, then one more per additional 50 m³. Sample at the point of placement, mark date, grade, and location, and cure in water until testing. A 7-day cube typically reaches roughly two-thirds of 28-day strength; the 28-day result alone decides acceptance. Site-mixed: cement by bags, aggregates by measured boxes, water measured, not guessed. Sand matters as much as cement; see our guide to M-sand vs river sand in India before ordering.
5. During casting: pour, vibrate, finish
Place concrete in layers, in bays, moving steadily so the pour stays continuous and no section sets before the next arrives.
Place, do not drop. Deposit concrete near its final position. Dropping it from above about 1.5 metres, or letting it fall through the reinforcement, separates stone from paste, a defect called segregation. Keep the chute or hose low, and move it rather than dragging concrete with shovels.
Vibrate properly. A needle vibrator removes trapped air so concrete packs around the steel. Insert vertically, hold until bubbles stop rising, usually 5 to 15 seconds per spot, then withdraw slowly, spacing insertions 450 to 600 mm apart. Under-vibration leaves air pockets and honeycombing; over-vibration drives stone down and paste up. Never push concrete with the vibrator, or rest the needle on steel or shuttering.
Screed and finish. Screed each bay level with a straight edge on the shuttering. Trowel only after the bleed water has evaporated; trowelling too early traps water and weakens the top layer, which later dusts and peels. In Indian summers, start early, and keep tarpaulins ready: rain washes cement out of a fresh surface.
6. After casting: curing is not optional
Concrete does not dry to gain strength, it cures: cement reacts with water, and that reaction needs moisture for days. Stop the water and the slab never reaches its design strength.
Start early, keep it wet. Begin curing as soon as the surface is hard enough not to be damaged by water. The common Indian method is ponding: low mortar bunds forming bays of about 2 m by 2 m, kept filled. Where ponding is not practical, use wet gunny bags, hessian, or an approved curing compound. Sprinkling twice a day in May is not curing: the surface must stay continuously damp.
How long. IS 456 Clause 13.5.1 sets the minimums: 7 days for ordinary Portland cement, 10 days in hot and dry weather; 10 days for blended cements such as PPC or PSC, or concrete with mineral admixtures, extending to 14 days in hot and dry conditions. In most of India, where PPC is common and summers are hot, plan for 10 to 14 days. Mark the curing start date on the slab and assign one person to it.

7. When to remove the shuttering: the IS 456 table
Striking formwork too early is how slabs sag: the concrete may look hard after a day but has only a fraction of its final strength. IS 456:2000 Clause 11.3.1 gives the minimum striking periods for ordinary Portland cement at normal temperatures; extend them for PPC or blended cements, or in cold weather.
| Formwork / member | Minimum period |
|---|---|
| Vertical formwork — sides of columns, walls, beams | 16 to 24 hours |
| Soffit formwork to slabs (props left under) | 3 days |
| Soffit formwork to beams (props left under) | 7 days |
| Props to slabs, span up to 4.5 m | 7 days |
| Props to slabs, span over 4.5 m | 14 days |
| Props to beams and arches, span up to 6 m | 14 days |
| Props to beams and arches, span over 6 m | 21 days |
The soffit can come off after 3 days, but the props stay 7 or 14 days depending on span. Pulling the props with the boards is the most common de-shuttering mistake on Indian sites. If the 7-day cube result is low or the weather has been cold, wait longer and ask the structural engineer. Do not stack bricks, sand, or the next floor's material on a freshly de-shuttered slab: early heavy loading causes deflection that does not recover.
8. The one-page checklist to keep on site
Evening before: shuttering line and level checked; props plumb and braced; joints tight, surface clean and oiled; openings, sleeves, conduits in place; reinforcement checked, cover blocks in place; concrete ordered, vibrators and labour confirmed.
On arrival: delivery ticket checked; slump test at placement; cubes sampled and marked; no water added.
During casting: concrete in layers, drop under 1.5 metres; needle vibrator vertical, 5 to 15 seconds per spot, never to push concrete; screed level, trowel after bleed water has gone; pour continuous, no unplanned cold joint.
After casting: curing started within hours, kept continuous, 7 days minimum for OPC, 10 to 14 for blended cement in Indian summers; ponding bays filled; de-shuttering per the IS 456 table, props left the full period; no heavy loading on the young slab.
The five mistakes that crack most slabs are all in this checklist: water added at site, curing stopped early, props pulled with the shuttering, steel on the shuttering, an unplanned cold joint. A slab cast to this checklist is not a guarantee, but it removes the usual reasons slabs fail. Keep the delivery tickets, cube reports, and a dated photo of the steel before the pour. For what a slab costs as part of the whole build, see our guide to house construction cost in India 2026, and for the foundation, our raft foundation vs isolated footing comparison.
This checklist covers the checks a homeowner or supervisor can make on site. Final member sizing, reinforcement, concrete grade, and de-shuttering decisions need project-specific assessment by a qualified structural engineer, based on your approved drawings, soil report, and the materials actually delivered.
Planning a build? Talk to RTPL Constructions for a site-specific review of your drawings before you order concrete.